A Guide to Useful Betaflight Modes
When you are setting up Betaflight after building a drone, you will come across a long list of modes that you can set. Some of them are extremely useful for FPV pilots. I have compiled the list of useful Betaflight modes so that it helps you to understand better what you can do with your drone.
What are Betaflight Modes
Betaflight allows you to get your drone into different “modes”. These modes can be separated into flight modes and non-flight modes.
You can assign the modes to your radio’s switches or buttons through vacant auxiliary channels. By doing so, the drone enters different modes when you press certain switches or buttons.
Flight Modes
Flight modes define how your drone flies. There are 4 flight modes in Betaflight that you can configure.
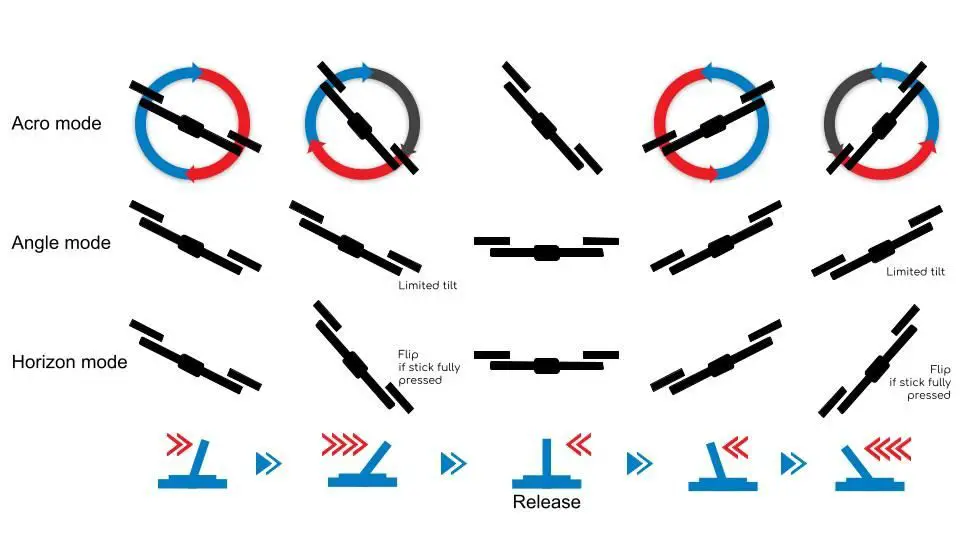
Acro Mode
In acro mode, you are flying your drone without any assistance from the flight controller. Each movement requires direct command input from your radio transmitter.
For instance, if you push the right roll, the drone will roll to the right. The drone will continue rolling even after you release the stick. To stop that, you need to push the stick to the left. And if you over-push it, it will roll to the left. And if you push the stick to max, the drone will flip.
Acro mode uses only the gyroscope (gyro). It is the most preferred mode used by FPV pilots for racing and freestyle.
Angle Mode
Angle mode is also known as an assisted or self-leveling mode. In angle mode, the drone tilts forward/backward/sideways in accordance with the angle of the roll/pitch stick relative to the center position.
For instance, if you press the stick 30° to the right, the drone tilts 30° to the right. Once you release the stick, the drone will automatically go back to its leveled position. If you push the to the max, the drone will tilt up until a predefined angle and stop there. It will never flip.
Angle mode is useful for anyone who needs a stable and non-aggressive flight. It requires both the gyro and accelerometer to be enabled.
Horizon Mode
Horizon mode is also a type of assisted or self-leveling mode. In horizon mode, the drone tilts in accordance with the angle of roll/pitch stick relative to the center position. However, there is no limit to how much the drone can tilt. Once you press the stick to the max, the drone can flip. Similar to angle mode, the drone returns to its original position automatically when the stick is released.
You will need to turn on your gyro and accelerometer to use horizon mode.
Acro Trainer Mode
Acro trainer mode is basically an acro mode that prevents your drone from flipping. If you are new to FPV and would like to learn to fly in acro mode, you should start with the acro trainer mode.
For beginners, flipping will usually lead to crashes. Through the acro trainer mode, FPV beginners who want to start training acro mode can safely do so.
Acro trainer mode requires both gyro and accelerometer to be enabled.
Non-Flight Modes
There are many non-flight modes that you can configure in the Betaflight. In this section, I will show you what are the useful modes that you can use. You can always refer to the Betaflight website if you need more information on all other modes.
Arm
Arming mode is pretty straightforward. It is a safety feature that prevents the motors from spinning unexpectedly (eg. if you accidentally hit the throttle) to avoid injury.
Once your drone is armed, it is ready to take off. You must set an arm mode for your drone! Don’t assign this on a momentary spring button. Otherwise you will have to hold to switch while flying your FPV drone!
Safety tip: Always disarm your drone after a crash before you retrieve it. Pull out the battery after retrieving the drone.
Prearm
Prearm is another layer of safety feature to avoid accidents. When enabled, you can only arm your drone if the prearm switch is pressed.
It seems to be redundant isn’t it? Well, it isn’t!
Sometimes we might accidentally hit and push the switch to the arming state without realizing. If we are holding the drone and accidentally push the throttle, there will be blood!
To reduce the chance of accidental arming, you can set a momentary spring switch on your transmitter (the switch that will return to its original position when released) as the prearm switch.
By doing so, your drone can only arm if you consciously press and hold the prearm switch while you press the arm switch.
Beeper Mode
Beeper mode triggers the beeper on your drone, if it has one. If not, you can buy it from GetFPV or Banggood.
The beeper is useful in 2 ways. In case you crash your drone, you can make it beep so that it’s easier to locate it.
You can also assign your beeper mode to share the same channel as your prearm mode. By doing so, whenever you press the prearm switch, your beeper will beep as an indication or warning that it can be armed.
Airmode
Airmode is usually used by pilots to gain better control in the air. Once enabled, it allows your drone to make sharp movement even with very low throttle.
For instance, if you want to make a big roll movement midair while maintaining a very low throttle, your drone will roll very slowly without airmode. With airmode, you can do a sharp and smooth roll.
There is a disadvantage with the airmode though. If you crash, your drone might behave crazily, by pushing up the throttle automatically. And when you land, your drone might automatically bounce off.
Here’s an insightful video if you want to understand the logic behind airmode.
Flip Over After Crash
This mode is also known as the turtle mode. If you crash on an empty field upside down, you can use this mode to flip your drone over and get your drone up in the air again. This saves you time from walking to your drone to retrieve it.
When triggered, 2 motors on the 1 side of the drone will spin in reverse directions (while the other 2 remain idle) to produce enough force to flip the drone. This only works with ESC with the DShot protocol though.
VTX Pit Mode
If your VTX has telemetry (either SmartAudio or Tramp), VTX pit mode allows you to switch your VTX to pit mode through your radio.
Pit mode is where your VTX power output is lowered to near 0 mW. This is usually used after your drone crashes in a race so that you can minimize interference to other pilots who are still racing, at the same time preventing the VTX from overheating since there is no air movement to cool it.
Paralyze Mode
Paralyze mode “paralyzes” your drone by preventing your drone from rearming. This is very useful for relay races as it prevents you from accidentally rearming the crashed drone.
Paralyze mode is sticky mode. That means once your drone is in paralyze mode, you need to unplug the battery to remove it from paralyze mode.
You can link the VTX pit mode to the paralyze mode such that when you trigger the paralyze mode, the pit mode is triggered automatically and remains sticky just like the paralyze mode. By disabling both radio and video, you can safely fly your backup drone.
GPS Rescue Mode
The purpose of GPS rescue mode is to allow your drone to fly towards the take off point automatically in case radio or video signal is cut off. You can, and should then resume control of your drone once the radio or video is connected.
You can set this as a failsafe option especially if you are flying long range. You can also set this on a switch to manually trigger it. Note that this mode is not designed to automatically land at the home point, and you might hit something en route.
GPS rescue mode requires a functioning accelerometer and GPS on your drone.
Failsafe Mode
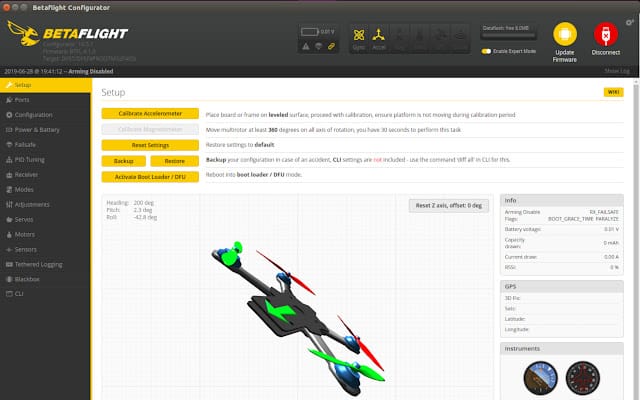
Failsafe mode is usually set up using radio transmitter. It works by stopping the drone if the radio signal is disconnected. This is usually configurable in radio transmitter. If your radio transmitter doesn’t support this, you can set up failsafe mode in Betaflight once you have enabled the expert mode.
You can leave the Fallback settings to Auto, which basically shuts your motors. Select drop mode instead of land mode as your failsafe. Drop mode stops the motors immediately, while the drone will slowly land if you use land mode.
In land mode, causes the motors to continue spinning, which can be dangerous since you can’t control your drone in failsafe.
Anti Gravity Mode
Anti gravity mode is used to prevent your drone’s nose from dipping/raising if you make a sudden change in throttle. That gives you a smoother flight and stable video. It does so by temporarily increasing the I term in the PID once it detects a sudden change in throttle.
Head Free Mode
Imagine the drone is in front of you. If its physical head is facing you, it can be confusing for you to maneuver the drone if you are flying with visual line of sight (VLOS). Your left becomes the drone’s right, and your front becomes the drone’s back. If you want your drone to move to your left, you need to push the stick to the right.
With head free mode, the drone will adjust its head by referring to the geographical direction when it is armed. As a result, its directions are aligned with yours as if you stand behind the drone when arming. For instance, when the drone is facing you (which is the default back direction when it is armed) and you want it to move to your left, just push the stick to the left.
Head free mode is very useful only if you are flying through VLOS but not FPV. And, you will need a magnetometer for your drone to use headless mode.
You can use head adjustment mode to redefine the direction of the drone if required.
How to Set Up Altitude Hold in Betaflight?
Unfortunately, Betaflight does not support altitude hold. If you need altitude hold feature for your drone, consider using iNAV instead. You need to have a barometer, compass and GPS on your quadcopter for altitude hold to work.
If iNAV is not an option, check out my guide on manually hovering your Betaflight drone.
Additional Information
What is Betaflight?
Betaflight is an open-sourced flight controller software used to configure your drone. It is the most popular FC software out there. Because of that, you can easily get support on Betaflight-related issues from the online community, and there are a bunch of Betaflight tutorials on Youtube.
Why Betaflight Over Other Software?
Betaflight is a preferred option for many pilots because of a few reasons. For one, it is supported by a wide range of FCs, including the top of the line FCs, mid-tier FCs and budget FCs.
In contrast, KISS and FlightOne require you to use their FCs. Both their FCs are good, but you simply don’t have many options. If we compare it with phones, using KISS or FlightOne (other FC software) is like using iOS. Only iPhones are loaded with iOS, and there are maybe 20 variants of iPhone that you can buy at a given time. Betaflight is like Android, and there are easily more than 1000 variants of phones that support Android at a given time.
Another reason for its popularity is the flexibility. There are simply so many things that you can configure using Betaflight! However, this can be overwhelming for those who just want to keep it simple. And those people may consider using KISS instead.
Lastly, the development of Betaflight is rather fast compared to other FC software. Each release is packed with a lot of features. This allows its users to enjoy better features, faster than non-Betaflight users.